Maintaining dental handpieces is an essential part of dental practice hygiene and instrument longevity. These highly specialised tools are at the core of modern dentistry and require meticulous care to perform efficiently. Effective maintenance ensures that dental procedures are conducted safely and helps to prolong the lifespan of these valuable instruments.

Routine care involves specific steps to clean, lubricate, and sterilise each handpiece, which not only promotes a hygienic environment but also safeguards against the premature wear of delicate components. Dental professionals must also be adept in identifying when a handpiece needs more thorough servicing or repair. Keeping handpieces in top working condition is a critical responsibility that directly impacts the quality of patient care.
Dental handpieces are a cornerstone of dental practice, integral for a variety of procedures. They come in various designs, each with specific components that enable their essential functions within the dental clinic.
High-speed dental handpieces are designed for tasks such as removing decay and polishing fillings, where speed and precision are necessary. They operate at an excess of 180,000 to 400,000 revolutions per minute (rpm). In contrast, low-speed handpieces function at around 8,000 to 40,000 rpm, suitable for tasks like removing the carious material and refining cavity preparations.
Electric handpieces provide a constant torque and can be used for a variety of tasks, including cutting through metal crowns and preparing teeth for restorations. These devices typically rely on an electric motor and may have a broader range of uses compared to their air-driven counterparts.
The functioning of handpieces is reliant on their design, which encompasses the integration of air turbines or electric motors, a precision bearing system within the turbine head, and a secure chuck mechanism to hold various dental burs. Coupling systems are implemented to connect the handpiece to the dental unit, providing power and rotation.
The turbine is a critical component of handpieces, functioning as the driving force especially in air-driven models. Inside, miniature bearings allow the turbine to rotate at high speeds, generating the cutting action required for dental procedures.
The chuck is the part of the handpiece which firmly grips the dental bur, ensuring that it stays in place during operative procedures. A well-functioning chuck mechanism can be either a push-button or manual twist type, enabling quick and secure changes of burs.
In each dental handpiece, there are mechanisms in place for cooling and illumination. Water spray is commonly used to cool the bur and tooth surface, preventing thermal damage, while LED lights may be incorporated to improve visibility in the oral cavity.
By understanding the types and functionality of dental handpieces along with their key components, dental professionals can effectively maintain and utilise these instruments to provide optimal patient care.
Routine maintenance of dental handpieces is crucial to extend their lifespan and ensure they function effectively. This involves daily cleaning, disinfecting, and proper lubrication.
After each use, dental handpieces should undergo a thorough cleaning process to remove debris. Start by brushing under running water; the water should ideally not exceed 38°C and must be of drinking quality, since high temperatures may damage the handpiece. Following this, use an alcohol-based disinfectant wipe to sanitise the exterior, ensuring all surfaces are covered before allowing it to dry. It is important to note that while autoclaving will sterilise the instrument, manual cleaning is necessary to remove physical matter.
The lubrication step is essential after cleaning and before sterilisation. A dental handpiece that is properly lubricated reduces the risk of wear and preserves the internal components. For handpieces that are not of the LubeFree variety, apply the lubricant according to the manufacturer’s guidelines, ensuring that excess oil is expelled by briefly running the handpiece. This flushing process ensures any residual debris is cleared, and lubricant is distributed evenly. Regular lubrication maintains the handpiece’s functionality and should be conducted with a high-quality oil recommended by the handpiece manufacturer.
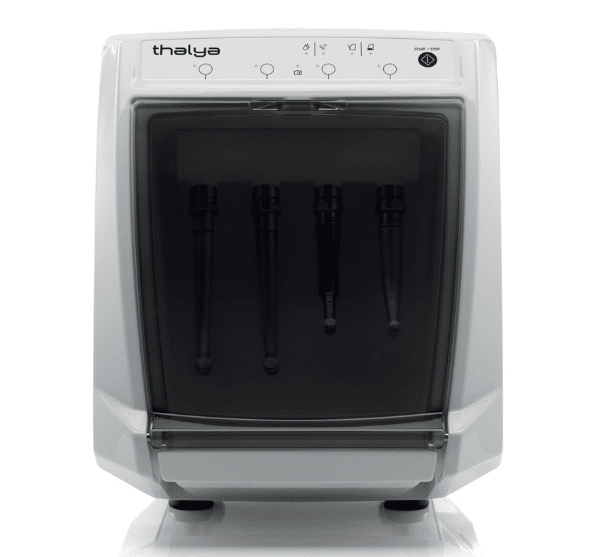
Dental handpieces require regular deep cleaning and sterilisation to ensure patient safety and instrument longevity. Precise procedures and the use of specific equipment are vital for effectively eliminating microbial contamination.
An ultrasonic bath is essential for the deep cleaning phase. Dental handpieces should be thoroughly cleaned using this process, where they are immersed in a specially formulated solution. The high-frequency waves produced by the ultrasonic cleaner help to dislodge minute particles and debris from difficult-to-reach areas.
It is crucial to follow up with proper rinsing under clean water to remove any residual cleaning solution.
Autoclaving is the gold standard for sterilising dental handpieces, employing high-pressure saturated steam to sterilise instruments effectively.
It’s important to follow the autoclave manufacturer’s instructions for operation and cycle parameters to achieve optimal sterilisation. Regular maintenance of the autoclave unit itself is also critical for consistent performance.

01253 736355
Opening hours
Mon – Thurs: 09:00 – 16:30
Fri: 09:00 – 16:00
Feel free to call outside of these hours and leave a message.
Alternatively, fill in a short form